a. Update your cluster
In this section, you will update the configuration of the HPC cluster you created in Lab I to:
- Create a post-install script to install Docker and Singularity.
- Provide access to the container registry, Amazon Elastic Container Registry (ECR).
- Create a new queue that will be used to run the containerized workload.
- Update the configuration of the HPC Cluster.
The following commands must be executed on the AWS Cloud9 environment created at the beginning of the tutorial. You can find the AWS Cloud9 environment by opening the AWS Cloud9 console and choose Open IDE
Preliminary
Prior to version 3.x, AWS ParallelCluster uses configuration file in ini format.
For the following steps, you will use an utility to manipulate ini files, named crudini.
That will make the editing easier and more reproductible.
In the Cloud 9 Terminal, copy and paste the command below to install crudini:
pip3 install crudini -U --user
1. Create a post-install script
In this step, you will create a post-install script that installs Docker and Singularity on the compute nodes.
cat > ~/environment/post_install.sh << EOF
# Install Docker
sudo amazon-linux-extras install -y docker
sudo usermod -a -G docker ec2-user
sudo systemctl start docker
sudo systemctl enable docker

# Install Singularity
sudo yum install -y singularity
EOF
For your post-install.sh script to be use by the HPC Cluster, you will need to create Amazon S3 bucket and copy the post-install.sh script to the bucket.
BUCKET_POSTFIX=$(python3 -S -c "import uuid; print(str(uuid.uuid4().hex)[:10])")
BUCKET_NAME_POSTINSTALL="parallelcluster-sc21-postinstall-${BUCKET_POSTFIX}"

aws s3 mb s3://${BUCKET_NAME_POSTINSTALL} --region ${AWS_REGION}
aws s3 cp ~/environment/post_install.sh s3://${BUCKET_NAME_POSTINSTALL}/
Now, you can add access to the BUCKET_NAME_POSTINSTALL bucket and specify the post install script path in the HPC cluster configuration file
PARALLELCLUSTER_CONFIG=~/environment/my-cluster-config.ini
crudini --set ${PARALLELCLUSTER_CONFIG} "cluster default" s3_read_resource "arn:aws:s3:::${BUCKET_NAME_POSTINSTALL}*"
crudini --set ${PARALLELCLUSTER_CONFIG} "cluster default" post_install "s3://${BUCKET_NAME_POSTINSTALL}/post_install.sh"
2. Access to the container registry
In this step, you will add permission to the HPC cluster configuration file to access the Amazon Elastic Container Registry (ECR) by adding the managed AmazonEC2ContainerRegistryFullAccess AWS IAM policy.
crudini --set --list ${PARALLELCLUSTER_CONFIG} "cluster default" additional_iam_policies "arn:aws:iam::aws:policy/AmazonEC2ContainerRegistryFullAccess"
3. Add a compute queue
In this step, you will add a new compute queue that use c5.xlarge EC2 instances.
Let create a new compute resources named c5xlarge:
crudini --set ${PARALLELCLUSTER_CONFIG} "compute_resource c5xlarge" instance_type "c5.xlarge"
crudini --set ${PARALLELCLUSTER_CONFIG} "compute_resource c5xlarge" min_count "0"
crudini --set ${PARALLELCLUSTER_CONFIG} "compute_resource c5xlarge" max_count "8"
Let create a new queue named c5xlarge:
crudini --set ${PARALLELCLUSTER_CONFIG} "queue c5xlarge" compute_resource_settings "c5xlarge"
Let add the new c5xlarge queue to the cluster:
crudini --set ${PARALLELCLUSTER_CONFIG} "cluster default" queue_settings "c5xlarge, c5n18large"
4. Update your HPC Cluster
In this step, you will update your HPC cluster with the configuration changes made in the previous steps.
Prior to an update, the cluster should be a stopped state.
pcluster stop hpc-cluster-lab -r $AWS_REGION
Before proceeding to the cluster update, you can check the content of the configuration file that should look like this:
cat ~/environment/my-cluster-config.ini
[vpc public]
vpc_id = ${VPC_ID}
master_subnet_id = ${SUBNET_ID}

[global]
cluster_template = default
update_check = true
sanity_check = true

[cluster default]
key_name = ${SSH_KEY_NAME}
base_os = ${BASE_OS}
scheduler = ${SCHEDULER}
fsx_settings = myfsx
master_instance_type = c5.xlarge
master_root_volume_size = 40
compute_root_volume_size = 40
additional_iam_policies = arn:aws:iam::aws:policy/AmazonSSMManagedInstanceCore, arn:aws:iam::aws:policy/service-role/AmazonSSMMaintenanceWindowRole, arn:aws:iam::aws:policy/AmazonEC2ContainerRegistryFullAccess
vpc_settings = public
ebs_settings = myebs
queue_settings = c5xlarge, c5n18large
custom_ami = ${CUSTOM_AMI}
s3_read_resource = arn:aws:s3:::${BUCKET_NAME_POSTINSTALL}*
post_install = s3://${BUCKET_NAME_POSTINSTALL}/post_install.sh

[queue c5n18large]
compute_resource_settings = c5n18large
disable_hyperthreading = true
enable_efa = true
placement_group = DYNAMIC

[compute_resource c5n18large]
instance_type = c5n.18xlarge
min_count = 0
max_count = 2

[fsx myfsx]
shared_dir = /fsx
storage_capacity = 1200
deployment_type = SCRATCH_2

[ebs myebs]
shared_dir = /shared
volume_type = gp2
volume_size = 20

[aliases]
ssh = ssh {CFN_USER}@{MASTER_IP} {ARGS}

[compute_resource c5xlarge]
instance_type = c5.xlarge
min_count = 0
max_count = 8

[queue c5xlarge]
compute_resource_settings = c5xlarge
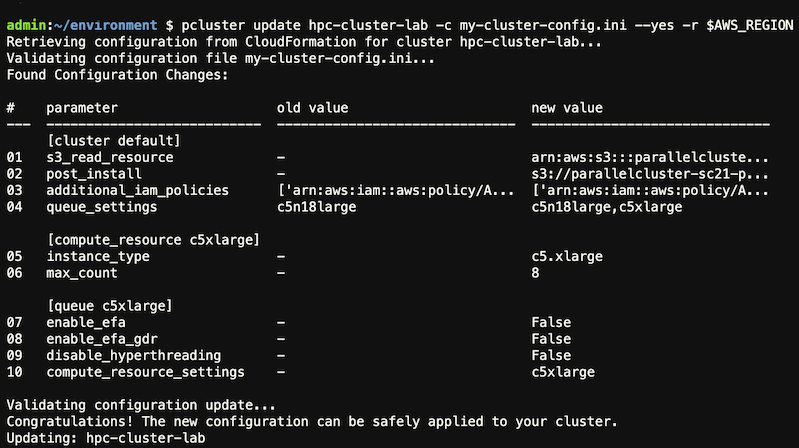
Let update the cluster by running the pcluster update command
pcluster update hpc-cluster-lab -c my-cluster-config.ini --yes -r $AWS_REGION
Pay attention to the old value and new value fields. You will see a new instance type under new value field. The output will be similar to this:
Start your cluster again after update process is completed.
pcluster start hpc-cluster-lab -r $AWS_REGION